Wednesday, July 25, 2012

Amazing Chewy Chocolate Chip Cookies

Okay... just when I thought that I had the best ever chocolate chip cookie recipe, I stumble upon these little morsels of happiness.  They have a wonderful texture and flavor.  One of my favorite parts is that they don't get stale the next day!  They taste like Soft Batch Cookies after the first day.  Try them.  Love them.  Thank me later.  :)  And do not overbake them!
 Amazing Chewy Chocolate Chip Cookies
source: http://kelseysappleaday.blogspot.com/2011/08/best-ever-chewy-chocolate-chip-cookies.html

3/4 c butter, softened
3/4 c brown sugar
1/4 c sugar
1 egg
2 t vanilla
2 c flour
2 t corn starch
1 t baking soda
1/2 t salt
1 c semi-sweet chocolate chips

 Preheat oven to 350 degrees.

In your mixing bowl, cream the butter and sugars for 2-3 minutes or until light in color and fluffy.  Add the eggs, one at a time. Mix well after each addition.  Add vanilla.

Mix in flour, cornstarch, baking soda, and salt.  Mix well.  Add the chocolate chips.

Plop the dough onto a cookie onto a cookie sheet and bake for 8-10 minutes.  I left mine in for the full ten minutes.

Onion Rings of Fire

When my husband and I were engaged, we went to my parent's house on the Fourth of July to do some fireworks in the front of the house.  My dad, beaming with an ear-to-ear smile, brought out this big ol' package of fireworks that he got at Sam's Club for a great price.  We just couldn't get over how cheap these big fireworks were.  Well, my brother lit the first one, and it was smoke... nothing but smoke.  We thought, "Hmm... that was a pretty cool smoke bomb.  It let off quite a bit of smoke.  We lit the next one.  Smoke.  Curious, we looked at the package and sure enough they were nothing but big smoke bombs.  We were a bit disgusted at first, but once we lit the rest of them all at the same time, we laughed hysterically as the whole street filled up with a plethora of colored smoke.  It still, almost ten years later, is one of my favorite fourths. 

Speaking of fireworks, I love me some Johnny Cash.  His music is great.  "Ring of Fire" is a classic of his, and although it generally reminds me of firework displays since you can't watch a firework show without that song popping up, I think it will from here on out remind me of these onion rings.  These were so tasty!  They were crunchy.  They had some good flavor.  They clear your sinuses.  They are hot!  Good golly!  The 1/4 c of hot sauce really comes through, so if you don't like heat, keep it out or keep it down.  If you love heat, you're in luck.  These are amazing.
Onion Rings of Fire (originally called "Rojo Onion Rings")
source: Guy Fieri Food

1/4 c hot sauce (If you can't handle heat, take it down to 1-2 T of hot sauce.)
1 T garlic powder
1/2 c ketchup

1 c buttermilk
1/2 c flour
2 c panko bread crumbs

fire extinguisher ;)

Canola oil

1 large sweet onion, cut into 3/8 inch slices, separated into rings, centers discarded

Soak the onion slices in the buttermilk for 30 minutes.

Meanwhile, prepare three bowls.  In the first, combine the hot sauce, ketchup, and garlic.  In the second, put the flour.  Put the panko bread crumbs into the third.

Once the onion slices are ready, place them in the flour, then the hot sauce mixture, then the panko bread crumbs.  Place them on a plate.

Once they are all dipped, put them in the fridge for 5-10 minutes.  Heat the oil in a saucepan over medium-high heat until it reaches 360 degrees. I used my deep fat fryer, but you can also heat them oil until a panko breadcrumb sizzles when you place it in there.

Fry the onion rings for about 3 minutes or until golden brown. Place on a paper towel-lined plate to drain a bit.

Serve with ketchup, ranch, or fry sauce.

Friday, July 20, 2012

Cajun Chicken Alfredo

I think an AARP convention was running through town recently, and they all had a pit stop at the local Freddy's steakburger and custard place that just opened up by me.  I was in there with my family, and there were honestly about five tables full of elderly folks.  

I walked past a table of four old women as I was holding my two-month old, and one of them said, "Oh, my!  Look at that adorable baby!"  I smiled and thanked her.  

Then, one of the piped out, "Is it a boy or a girl?"  
As I look down at her purple outfit and little pink bracelets, I reply, "A girl."  

Another one said, "What is her name?"  

"Scarlet."  

I get this all the time... "OOOH!  Like Scarlet O'Hara."  

"Yes, but I have never seen Gone with the Wind."

All four of them gasped.  "Oh, it is a wonderful movie!"  "A Classic!"  "Scarlet O'Hara is just beautiful."

"Yeah, well, I named her Scarlet because my maiden name is Redd."

One of them, who might need to get hearing aids said, "Oh, like Rhett Butler." 

"Umm... I think my hamburger is ready.  Bye ladies!"

I ate my dinner, and as I was leaving with my husband and three kids, we passed the same table of grandmas.  One said, "Are all of those yours?!"  No lady.  I plucked one from Target, one from ebay, and the other I found in a woven basket in the river.  I was tempted to give a sarcastic response, but I just smiled and nodded and thanked the dear Lord that I look ten years younger than I am.  

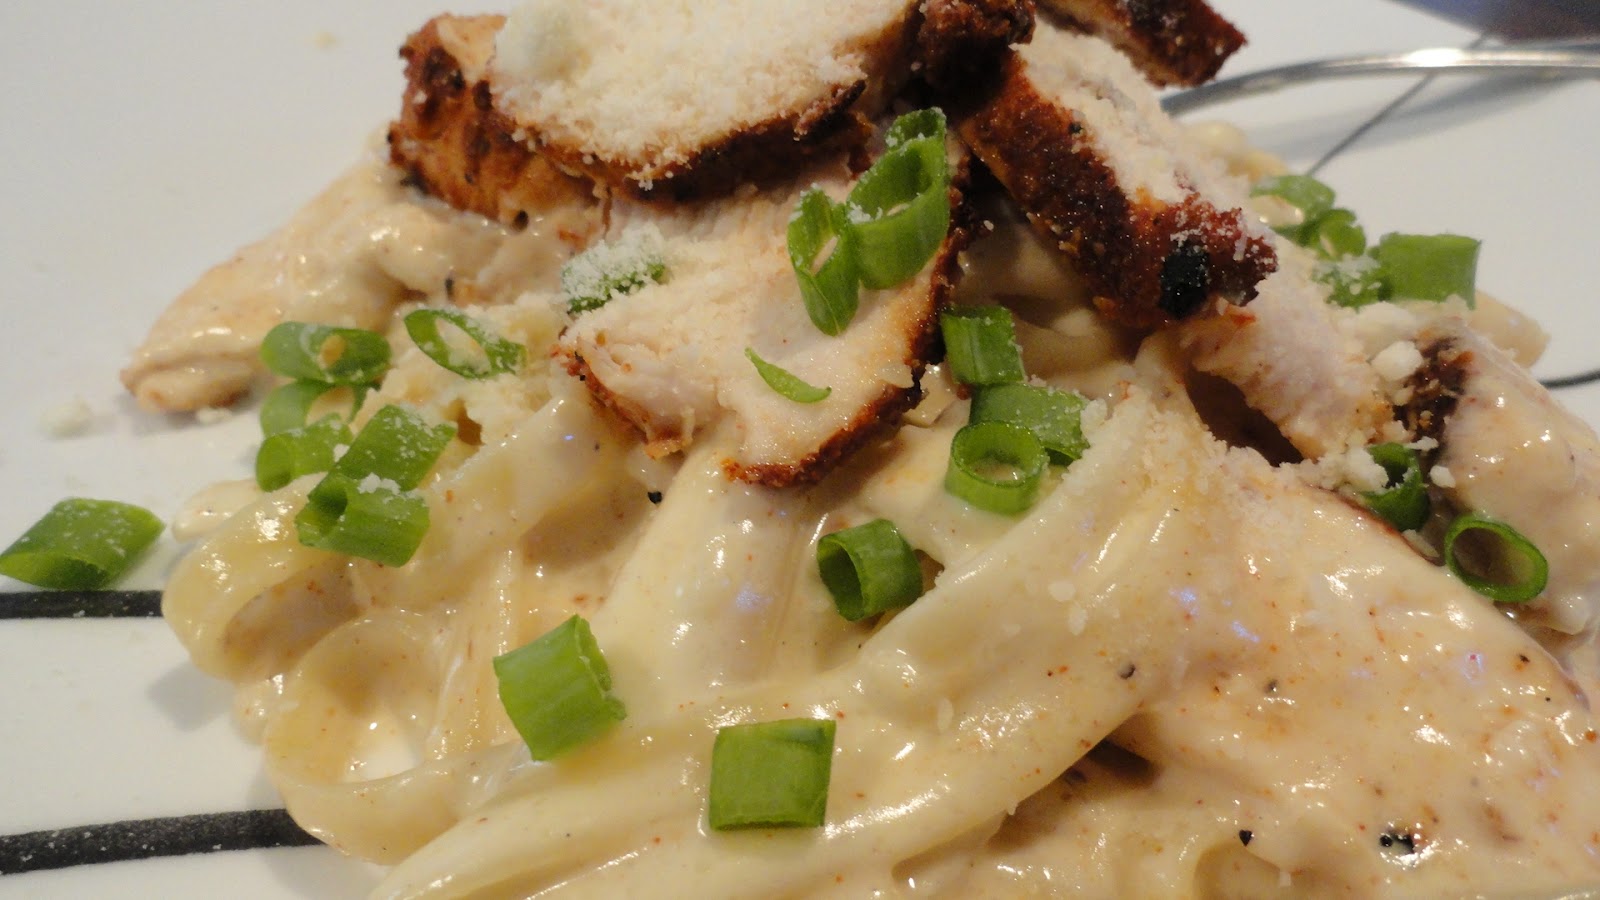
Now, a quick word on the actual recipe.  This is one of my new top five favorite recipes ever! My awesome neighbor let my borrow Guy Fieri Food, and it is possible that she may never get the cookbook back.  Sorry, Madison!  :)  I found this recipe in there, tried it, and ate every last bit of it from my plate.  The chicken was so tender, juicy, and flavorful.  The alfredo sauce was fantastic.  I loved it.  Loved it.  Loved it.  Did I mention that I loved it?  I will be making this over and over and over.  And over.


 Cajun Chicken Alfredo
source: Guy Fieri Food

Blackening Spice Rub:
2 T salt
1 T garlic powder
1 T freshly cracked black pepper
2 t ground white pepper
2 t onion powder
2 t cumin
1 t cayenne
3 T paprika

2 chicken breasts
1/4 c blackening rub
1 T olive oil
1 1/2 T minced garlic
2 T dry white wine
1 1/2 c heavy cream
1/2 c chopped sun-dried tomatoes (I omitted these)
1/2 pound fettuccine
1/4 c plus 2 T Parmesan cheese
1/2 t sea salt
1/2 t black pepper
2 T thinly sliced green onion

Preheat the oven to 350.  Prepare a pot of water to a boil.  Preheat a skillet over very high heat.

Place the blackening rub in a Ziplock bag.  Add the two chicken breasts and shake to coat.  Blacken the chicken in the preheated hot skillet- 2 to 3 minutes per side.

Place the chicken breasts to a baking sheet and place in the oven for ten minutes or until the chicken is cooked through (165 degrees).

Meanwhile, heat the olive oil in another skillet over medium-high heat.  Add the garlic and cook for 2 minutes.  Add the wine.  Add the heavy cream, simmer, and cook until it is reduced to about half.  If it is not thickening, you can combine 2 T cream and 2 T corn starch in a small bowl.  Stir it well.  Add it about 1 T at a time.  After each addition, let the mixture come to a simmer to see if it thickens enough.  Once it is a thickness you like, don't add any more of the cornstarch mixture.

Remove the chicken from the oven after it is cooked through.  Slice it very thinly.

Add half of the chicken and the sun-dried tomatoes (if using) to the pasta sauce.

Cook the fettuccine according to package directions.  Drain.

Add 1/4 c parmesan cheese, salt, pepper, and fettuccine to the sauce.  Toss to combine.

Scoop some of the pasta onto plates.  Top with more slices of the chicken.  Sprinkle it with green onions and the remaining Parmesan cheese.
  Be prepared to have your mind blown.
I want it again already.

Oreo Marshmallow Bars

I recently went to visit my friend Chelsea, who was visiting from out of town.  She's actually one of the girls that inspired me to start this blog.  Thanks, Chelsea!  Anywho... she told me about this amazing dessert.  It follows the same recipe as Rice Krispy Treats, but instead of rice krispies, you use the crumbs of one package of Oreos.  Brilliant!  So, I was out grocery shopping, and I texted her to make sure I remembered the recipe correctly. It went like this:

Me: Hey Chelsea, how much butter and marshmallow do you use for those Oreo bar things?
Response: A lot.  But you have the wrong number.
Me: I guess you never can go wrong with a lot of marshmallows and butter in any recipe.  Sorry for the wrong number though.
Repsonse: No problem.

I thought it was hilarious that the person responded "a lot" instead of simply saying it was the wrong number. 

Now, looking at the picture, it looks like a wad of tar.  Even more so in real life because the marshmallows and butter get all shiny when mixed with the Oreo crumbs.  When I took them up to my kids and their friends that were over here, one of them said, "What is that? It looks like a rock."  My response, "Just eat it.  It will be the most delicious rock ever."  Sure enough, they devoured the rocks.  

These are really easy to make, and they are so delicious.  The texture and flavor is great.  I'm a huge Oreo fan, so these are right up my alley.  
 Oreo Marshmallow Bars
source: Chelsea (I'm not sure where she found the recipe)

1 package Oreos, crushed into crumbs
4 T butter
5 c mini marshmallows

In a large saucepan, melt the butter and marshmallows over low heat until they are melted and smooth.

Add the Oreo crumbs.  Mix well.

Press into a greased 8x8 pan.

Let them sit for about 10-15 minutes then cut into small squares.  These aren't quite like rice krispie treats where you can eat a 5 inch by 5 inch square.  They are really rich.  Delicious, but rich.
Thanks Chelsea for the recipe!

Snickerdoodle Muffins

Okay... I know I was ragging on Pinterest recently, but I have come around.  I now realize that Pinterest is a place where I can browse hundreds of recipes and create by own customized cookbook.  Awesome!  Among all of the wonderful recipes I have found was this Snickerdoodle muffin.  Oh, man.  These were just like eating a bloated, puffed up Snickerdoodle cookie.  My kids and husband gobbled them up!  And maybe I had one more than I should have.  Or two.  
 Snickerdoodle Muffins
source: http://www.culinaryconcoctionsbypeabody.com/2007/03/16/cookie-conversion/

2 sticks butter
1 c sugar
2 t vanilla
2 eggs
3/4 t baking soda
3/4 t baking powder
3/4 t cream of tarter
1/4 t nutmeg (I omitted this)
1 1/4 c sour cream
2 1/4 c flour

coating:
1 c sugar
2 T cinnamon

See this picture?  Do your eyes deceive you?  Most people would see this and say, "Hey!  Those look like some tasty Snickerdoodle cookies."  Oh, no, my friends.  These are the tops of the muffins.  Mmmm.. Did you ever see that Seinfeld episode where Elaine wanted to start a place that sells only the muffin tops?  Her boss steals the idea and calls the restaurant "Top of the Muffin to you!"  They try to get rid of the bottoms of the muffins by giving them to a homeless shelter, and the homeless folks were all upset that the tops were missing.  However, if they had the bottoms of these muffins I don't think they would protest!  They are amazing through and through.


Preheat the oven to 350 degrees.

Cream the butter and sugar for 3-5 minutes or until it is nice and fluffy.

Add the vanilla.  Mix.  Add the eggs, one at a time, to the mixture and mix well after each addition.

In another bowl, combine the flour, baking soda, baking powder, and cream of tarter.  Whisk it.  Whisk it good.

Add the flour mixture and the sour cream alternately, beginning and ending with the flour.

In another small bowl, combine the sugar and cinnamon.  Use a cookie scoop to plop some of the batter in the cinnamon-sugar bowl.  Roll the dough around until it is fully coated.

Put the dough into greased muffin tins.  Better yet, use paper liners.  I had one heck of  time getting some of the muffins out.

Bake them for 20-22 minutes of until golden brown around the edges.  A toothpick should also come out clean.
 Cookie?  Nope... muffin.
 Muffin?  Oh yeah.
PS- Thank you Peabody for posting this amazing recipe!  I love it.

Monday, July 16, 2012

Chicken Lime Tacos

I graduated from college almost ten years ago, but I still have dreams that I am going back to college for more education.  It is always back to Snow College, where I got my Associate's degree.  This time in my dream, I went to get my apartment.  The apartments in the complex were categorized.  I saw "dance team girls," "Soccer girls," "Volleyball girls," and "Test anxiety girls."  I remembered thinking in my dream, "Oh, man.  I'm probably going to end up in that apartment."  It made me laugh so hard when I woke up.  Luckily, I woke up before my subconscious categorized me in an apartment with a bunch of people that get anxiety at the near mention of a number two pencil and little bubbles.  

If there was an apartment labeled "Mexican Food Lovers," I would surely end up in there.  Especially as of late, I just can't get enough of the stuff!  I found this taco recipe on favfamilyrecipes.com, and it is so delicious!  The fresh lime flavor really packs a punch, and it is just a really fresh and light taste for the ridiculously hot Las Vegas summers.  It's actually healthy, too!  
 Chicken Lime Tacos
source: favfamilyrecipes.com

1 1/2 lb chicken, cubed
1/4 c red wine vinegar
juice of 1 lime
2 t sugar
1 t salt
1 t black pepper
4-5 green onions, chopped
4 cloves garlic, minced
4 T fresh cilantro, chopped

flour tortillas

toppings:
pico de gallo
guacamole or avocados
cheese
Shredded lettuce
Chopped cilantro
sour cream
taco sauce

Heat a skillet with 1-2 T of vegetable oil over medium-high heat.  Add the chicken and cook until it is white on all sides.  In a small bowl, combine vinegar, lime juice, sugar, salt, and pepper.  Add to the chicken.  Simmer an extra ten minutes or until the chicken is cooked through.

Put the chicken mixture on a tortilla and top with your favorite toppings.

 I love this recipe!  It's so simple and delicious.  It's almost so good that I want to add extra exclamation points.  However, my obsession with correct punctuation has overruled.  :)  Now go make some delicious and healthy tacos.

Thursday, July 12, 2012

Creamy Salmon Linguine

This was quite the tasty lunch!  I happened to have everything on hand for this recipe, so I gave it a whirl.  Mmm!  It came together in about 25 minutes, and it really was delicious.  I could have done without with capers since I'm not a fan of little olive things that taste like they have been marinated in ocean water for 100 years.  But- if you're into that sort of thing... go right on ahead an add them.  
 Creamy Salmon Linguine
source: Taste of Home Simple and Delicious August/September 2012
serves 4

8 oz uncooked linguine
1 bunch broccoli, cut into florets
2 garlic cloves, minced
2 T butter
2 c heavy whipping cream
2 T lemon juice
1 lb. fully cooked salmon, flaked
1/4 t salt
1/4 t pepper
1 c shredded Parmesan cheese
1 T dry basil or 3 T fresh minced basil
2 T capers
2 t lemon zest

Cook the linguine according to package directions, adding the broccoli during the last five minutes of boiling.

Meanwhile, Heat a large skillet over medium-high heat.  Add the butter.  When it's melted, add the garlic and cook for one minute.  Add the cream and lemon juice.  Bring that to a boil.  Reduce heat and simmer , uncovered, for 2-3 minutes.  Stir frequently.

Add the salmon, salt and pepper.  Heat through.  Drain the linguine and broccoli.  Add it to the skillet and toss to combine.  Finally, add the Parmesan cheese, basil, capers, and lemon zest.

Monday, July 9, 2012

Teriyaki Chicken

I have a confession to make.  Most crockpot meals terrify me.  They don't terrify me like a zombie clown, a flock of rabid birds, or a dirty dish rag but mainly because they have cream of ______ soup in them, and I refuse to use that soup in any meal.  There is enough sodium in those cans of soup to put the Dead Sea to shame.  I was all excited when I found this recipe because there is no soup involved.  Hip hip!  I made it, we loved it.  The teriyaki sauce is homemade, and it is wonderful.  This is a quick meal to make too.  Added bonus!  
 Teriyaki Chicken
source: http://lakelurecottagekitchen.blogspot.ca/2011/08/crock-pot-teriyaki-chicken.html

1 1/2 pounds chicken breasts (the original called for chicken thighs, but I prefer breasts)
1/4 c plus 2 T soy sauce
1/4 c plus 2 T sugar
3 T cider vinegar
1/2 t ground ginger
1/2 t minced garlic
1/8 t pepper

1 T corn starch
1 T water

green onions, chopped

Put the chicken into your crockpot and set to low.  Combine the sugar, soy sauce, cider vinegar, ginger, garlic, and pepper.  Pour over the chicken.  Cook on low for 3-4 hours.

Prepare white rice according to package directions.

When the chicken is done, remove it to a plate and set aside.  Pour the sauce into a saucepan and heat over medium-high heat.  In a small bowl, combine the water and cornstarch.  Once the sauce is boiling, add the cornstarch mixture.  Stir until thickened.

Put the rice on a serving platter, top with chicken, spoon the sauce over the top, and finish it up with the green onions.


Glazed Doughnuts

When I was little (and perhaps all the way until my late twenties) I could not contain my excitement for Christmas.  I was the snooping queen.  I think that I had a sixth sense for finding out what my Christmas would be or where they were hiding.  It got to the point that my mom had to put secret codes or riddle on the boxes to prevent me from discovering my presents too early.  Well, a paring knife fixed that problem!  One year, I actually cut open the presents where the tape was, peeked inside, and taped them back closed again.  I like to do things early.  Like dessert for breakfast.  That's my kind of day- doing it all completely backwards.  

As a quick side note... You know that term "what goes around comes round?"  Well, I had an ultrasound for my second baby early in the pregnancy, and the first time ultrasound tech told me it was a girl.  Well, come delivery day, I was all excited for another girl.  After the delivery, the doctor says, "It's a girl!  Just kidding... it's a boy."  I about fell off the operating table.  Well played, God.  :)  Sure enough, it was a boy.  That'll teach me for trying to figure things out early.

Back to the recipe... I love that when I was putting in the label for this post I typed in breakfast then I typed in dessert, too.  I love desserts that can pass for breakfast.  Score!  These doughnuts seriously take about 15 minutes to make.  They have a wonderful taste and texture, and you don't have to make the dough.  You use Pillsbury refrigerated biscuits.  Amazing!  Where have these been my whole life?!  My husband, kids, and a friend all sampled them and were blown away.  I can't wait to make these again and again.
 Glazed Doughnuts
source: http://www.littlebitfunky.com/2011/11/what-i-made-for-monday-naughty-donuts.html?m=1


canned biscuits (not the flaky ones)
vegetable oil for frying
about 1/4 c butter, melted (if you want to do cinnamon sugar doughnuts)

cinnamon sugar coating:
1/2 c sugar
1 T cinnamon

Glaze:
1 1/2 c powdered sugar
1/4 t salt
1/4 t vanilla
1/4 c cold milk or water

sprinkles, optional

Doesn't that look wonderful?!
 Open the can of biscuits and separate them.  I used the buttery ones, but I think I'll try buttermilk next time.

Put enough oil in your skillet to come up about 1/2 inch.  Preheat the oil over medium/medium-high heat.

Use a lid from a 2 liter bottle, lemon juice, or some other similar-sized lid to cut holes in the doughnuts.
 Test the oil by putting a doughnut hole in there.  If it starts bubbling around the doughnut hole, you're good to go.  Let the dough cook until it is golden brown.  Flip it and cook the other side. They should be a nice golden brown color.
 If you want to do cinnamon sugar coating, melt the butter in a bowl.  Toss the fried doughnuts in the butter.
 Place in another bowl with the cinnamon sugar.  Toss to coat.  You could also put the sugar mixture in a Ziplock or paper bag and toss to coat that way.
 Here is a shot of the doughnuts before they got glazed.
 Combine the glaze ingredients in a bowl and whisk to combine.  Dip the warm doughnuts into the glaze.  Set on a paper towel-lined plate to cool.
 Add sprinkles if you'd like.  My kids though it was the coolest with the sprinkles.  Five mom points for me.
I'm telling you... These are wonderful!

Outback's Alice Springs Chicken

Sometimes things should not go together.  For example, a person with Misophonia sitting among contestants for a gum chewing competition.  A hungry dog and a fresh shipment of a half cow to go into your freezer.  A cranky four year old and a lengthy 2 1/2 hour parade in 100 degree weather.  Not that I experienced that over the fourth of July.  Speaking of that, a mother of a newborn running on three hours of sleep, without breakfast, and holding a sleepy baby for a 2 1/2 hour parade in 100 degree weather just may be the most dangerous combination ever.  Not that I would know that either!  Here's the ultimate bad combination: Angelina Jolie's lips, Steve Buscemi's teeth, Michael Jackson's nose (post 200 surgeries), David Bowie's eyes, and Bob Ross' hair.  Man- I think I just created the scariest-looking person ever. I would have thrown in a clown nose, but Michael's Jackson's freakishly small nose is way more frightening than a clown nose.

This combination of ingredients here on this chicken is wonderful.  If I had any doctors hanging out here tonight, I would have him/her come on here and make a statement that goes something like this, "Good evening.  I am here to talk about the Alice Springs Chicken.  While this dish is incredibly delicious, if you eat this on a regular basis, you will have a heart attack and/or high cholesterol.  Thank you for listening to this message."  Seriously though, I think this recipe has some serious calories packed into it. However, I don't see any harm in eating in occasionally.  It is quite the mouthful of flavors.  I loved every bite!
 Alice Springs Chicken
source: http://www.favfamilyrecipes.com/2012/02/our-version-of-outbacks-alice-springs-chicken.html
serves 2
marinade:
1/2 c grey poupon
1/2 c honey
1/4 c mayonnaise
1/2 t lemon juice

chicken:
2 chicken breasts
1 T vegetable oil
1 c sliced mushrooms
1 T butter
salt and pepper
paprika

4 slices bacon, cooked
1/2 c Monterey Jack cheese, shredded
1/2 c cheddar cheese, shredded
2 t fresh parsley, minced

Combine the marinade ingredients in a Ziplock bag.  Pour out half of the marinade and reserve it.  Add the chicken to the Ziplock bag.  Place in the refrigerator and marinade for 2 hours.

Preheat the oven to 375.

Put the vegetable oil in a skillet over medium-high heat.  Sear the chicken breasts for 3-4 minutes per side or until golden brown.

Meanwhile, saute the mushrooms in butter until the have reduced.

Once the chicken is finished, remove the breasts and put them in an ovenproof dish.  Sprinkle them with salt and pepper.  Sprinkle some paprika on top as well.

 Top with some bacon.
 Top with some sauteed mushrooms.
 Top that with some shredded cheese.
 Bake in the oven for 7-10 minutes.  The cheese will get all melty and amazing.  Serve with the remaining marinade.
I served this with a side of cardiologist and heart attack medication.

Monday, July 2, 2012

Cinnamon Roll Pancakes

I went out the other morning with my two daughters.  We were headed to Sam's Club.  I'm lugging the baby in her carseat with one arm and holding my older daughter's hand.  I get into Sam's Club, flash my card, and the lady says, "Oh, are you not a plus member?"  "No, I'm not." "Well, the club is only open for plus members right now.  It opens for regular customers in twenty minutes.  Would you like to upgrade?"  I wish I could have seen the look that I flashed at her.  I think it may have turned her to stone for just a couple milliseconds.  All disgruntled, I lug the girls back across the parking lot. I figured since we had twenty minutes to spare, we'd go get a little something for breakfast.  Panera was close by.  We ordered our food and sat down.  I was savoring every bite of my bagel and enjoying a quiet breakfast.  As I took a bite of my bagel, I glanced at my daughter, who at that very moment karate-chopped her muffin in an attempt to break it in half.  She didn't notice that I saw her, and I asked, "Did you just karate chop that muffin?"  She laughed and nodded.  We both started laughing hysterically.  Ever since, she has been trying to karate chop things in half, unsuccessfully, but I get a kick out of it every time.

She even tried to karate chop these pancakes in half, and all she ended up with was an icing-covered delicious mess on her hand.  Let me say this... this pancakes are amazing!  I want to know why these have not been in my life for the past thirty years!  Where, oh where, have you been sweet pancakes?  My husband, who has never been one to enjoy pancakes, took a bite, paused, and confessed his undying love for me right there at the table.  These really are pretty simple.  And besides, the taste in your mouth is well worth the extra few minutes it takes to whip these up.  

Praise cinnamon roll pancakes!  I hope some eloquent poet somewhere in the world has a poem dedicated to these.  If not, there should be.

 Cinnamon Roll Pancakes
source: http://www.life-as-a-lofthouse.blogspot.com/2012/02/cinnamon-roll-pancakes.html

Pancakes:
1 c flour
2 t baking powder
1/ t salt
1 c milk
1 T canola oil
1 egg

Cinnamon Filling:
1/2 c butter, melted
3/4 c brown sugar
1 T cinnamon

Icing:
4 T butter
2 oz cream cheese
1 1/2 c powdered sugar
1 t vanilla

Make the cinnamon filling first.  Measure ingredients into a small ziplock bag.  Place mixture into the fridge while you prepare everything else.

In a bowl, add the dry ingredients for the pancakes.  Whisk them together.  Add the milk, oil, and egg.  Whisk just until combined.  Don't overmix.

While that sits, prepare the icing.  Melt the butter and cream cheese in the microwave.  Take it out and add the powdered sugar and vanilla.  Set aside.

Heat a griddle over medium heat.  Get your cinnamon filling out of the fridge and cut a small hole in one of the corners of the bag.

Once the griddle is hot, add about 1/2 c pancake batter.  Squeeze some of the filling out in a spiral pattern on the pancake before flipping it.  Don't get too close to the edge!  If you do, the cinnamon filling will ooze off the side and create a big ol' mess on the griddle.  Not that it happened to me!  ;)

Once bubble pop up on the top surface and the bottom is golden brown, flip the pancake and cook a couple minutes longer.

Serve on a plate drizzled with some icing.
Ridiculous.  And when I say ridiculous, I mean ridiculously delicious!